In order to secure the login process with two factor authentication in an application there are different approaches.
Two-Factor-Authentication via standard protocols and plugins
With privacyIDEA we used standard protocols like RADIUS and SAML. If the application that you need to protect can facilitate RADIUS or SAML, the validate of the second factor can be performed by the privacyIDEA RADIUS Server or by privacyIDEA acting as a SAML Identity Provider. In this case you only need to change the configuration of the application, but you do not need to change the application.
Other applications provide an authentication framework, where the authentication can be extended using plugins. For such scenarios many different plugins are available to connect the application to the privacyIDEA Authentication Server. As of know a long list of plugins is already available for applications like TPYO3, ownCloud, NextCloud, WordPress, dokuwiki, django, OTRS, Apache, NGINX, PAM/OpenVPN and also for authenticating at the Windows Desktop.
But some applications do not support RADIUS or SAML and also do not provide an authentication framework to add 2FA via a plugin. Sometimes simply time is short, to develop a plugin in the corresponding programming language.
privacyIDEA LDAP-Proxy
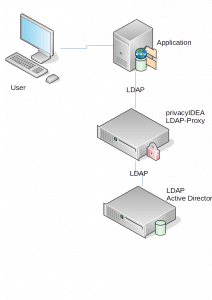 To also provide strong authentication also for those applications and authenticate the users with two factors against privacyIDEA, we develop the privacyIDEA LDAP-Proxy.
The privacyIDEA LDAP-Proxy can be used, if the application authenticates the users against an LDAP server like OpenLDAP or Microsoft Active Directory. The privacyIDEA LDAP-Proxy is plugged between the application and the originial LDAP server. The application is reconfigured, to not use the LDAP server for authentication anymore, but to authenticate users against the LDAP-Proxy. Now, the privacyIDEA LDAP-Proxy can authenticate the users and verify the the authentication against the privacyIDEA Server and use the original LDAP server to only fetch user data.
The two factor authentication is totally transparent for the user and for the application.
The advantage of the IT department is obvious: The originial LDAP server is not touched or modified. The program code of the application is not modified or exteneded. The application is only reconfigured within the limits of the intended possibilities and supported scenarios. To the application the LDAP-Proxy looks like a normal LDAP server. Thus you will not loose any warranty and support by the vendor of the application.
In contrast to two factor solutions, which are solely based on OpenLDAP, the privacyIDEA LDAP-Proxy has one big advantage. It will work with any kind of originial LDAP server, be it OpenLDAP, Microsoft Active Directory or Samba.
Example Scenario
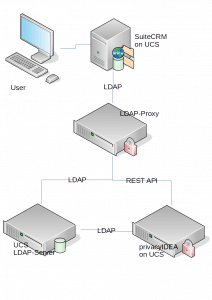 In our example scenario we look at the login at SuiteCRM. SuiteCRM is an Open Source Customer Relation Management solution. There are no two factor plugins for SuiteCRM. But SuiteCRM authenticates it’s users against LDAP. So we will configure SuiteCRM to authenticate the users against the privacyIDEA LDAP-Proxy to add transparent two factor authentication to SuiteCRM.
We could also look at any other application, which authenticates users against an LDAP server. But SuiteCRM suites us well. We install SuiteCRM on the Univention Corporate Server. The installation of the application works like a charm, SuiteCRM is nicely configured against the Univention Corporate Server Domain Controller – the original LDAP server. This is just to have the test scenario up and runing in a few minutes.
We can install the privacyIDEA Authentication Server on any Linux distribution or we can also install the privacyIDEA Server on the Univention Corporate Server. privacyIDEA is also contained in the Univention App Center and can be installed on the UCS within a few minutes. Then privacyIDEA is setup against the users in the Univention LDAP server automatically and the administrator only needs to enroll or assign tokens like Yubikeys, OTP tokens or smartphone apps to the users.
SuiteCRM will be configured this way, that it does not connect to the UCS LDAP server but to the privacyIDEA LDAP-Proxy.
If needed several of the components can be installed on one single system.
Integration
LDAP-Proxy installieren und konfigurieren
The privacyIDEA LDAP-Proxy is currently available via Github in a beta version. It is developed based on Python and Twisted. Thus there are many different ways for the deployment. All necessary configurations are done in configuration file once.
The administrator needs to tell, were the original (UCS) LDAP server and the privacyIDEA instance are located. In the SuiteCRM setup an additional LDAP service account is needed, which the administrator also adds to the configuration file.
For more detailed information see the file README.md.
To start the LDAP proxy run
twistd -n ldap-proxy -c config.ini
In a productive environment you would start the LDAP proxy automatically as a service via systemd. The configuration file config.ini can be stored at the location of your choice. The file example-proxy.ini contains a lot of comments, which explain all possible configuration settings.
The configuration file
The administrator needs to adapt the following configuration settings:
The parameter instance in the section privacyidea determines, where the LDAP proxy can contact the privacyIDEA Authentication Server.
The administrator needs to define the connection to the original LDAP server in the section ldap-backend including IP address or FQDN and the protocal being LDAP, LDAPS or LDAP+STARTTLS
The parameter endpoint in the ldap-proxy section also contains the information on which port the original LDAP server is listening.
Finally the administrator needs to configure the LDAP attribute which contains the loginname. This can be done using the paramter attribute in the sections user-mapping.
The service account allows common LDAP searches
Simple applications, which only verify the user with a user bind do not need any additional settings. However, SuiteCRM uses an additional service account for common LDAP searches. The administrator needs to add this service account in the section ldap-proxy with the parameter passthrough-binds and in the section service-account.
Configure SuiteCRM
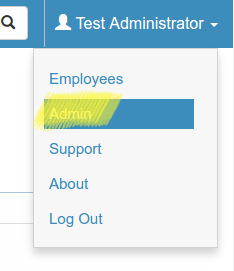
In SuiteCRM the administrator only needs to reconfigure the LDAP server. Go to the Admin-Menu which can be reached in the upper right corner.
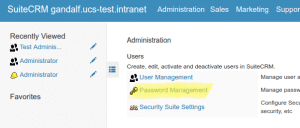
Choose Password Managemant.
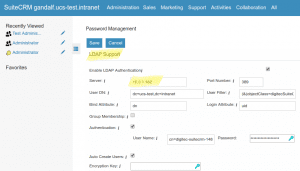
Here you can configure the LDAP server. Enter the FQDN or IP address of the new LDAP proxy.
Done.
Conclusion
The SuiteCRM user is now authenticated via the LDAP proxy against privacyIDEA. The complete password entry is sent to privacyIDEA for validation. The user has to enter his static (probably LDAP password) and the OTP value. Thus you can also do smooth migrations since this looks the same to the user.
Which device (2nd factor) the user has to use for authentication is completely centrally defined by privacyIDEA. The administrator can also assign different device types to the users. Some users can authenticate with Yubikeys, others with OTP tokens or OTP cards, some with a smartphone app like the Google Authenticator and some users may get their login code via SMS or Email.
We will continue developing the LDAP-Proxy and we are looking forward to any feedback. If you want to stay updated watch the Github repository or subscribe to our newsletter.

