Using the Yubikey and the Nitrokey with privacyIDEA is great. With the privacyIDEA admin client you can initialize the secret seeeds on both devices and thus achieving the highest trust with privacyIDEA. The vendor does not generate the seeds anymore – you do.
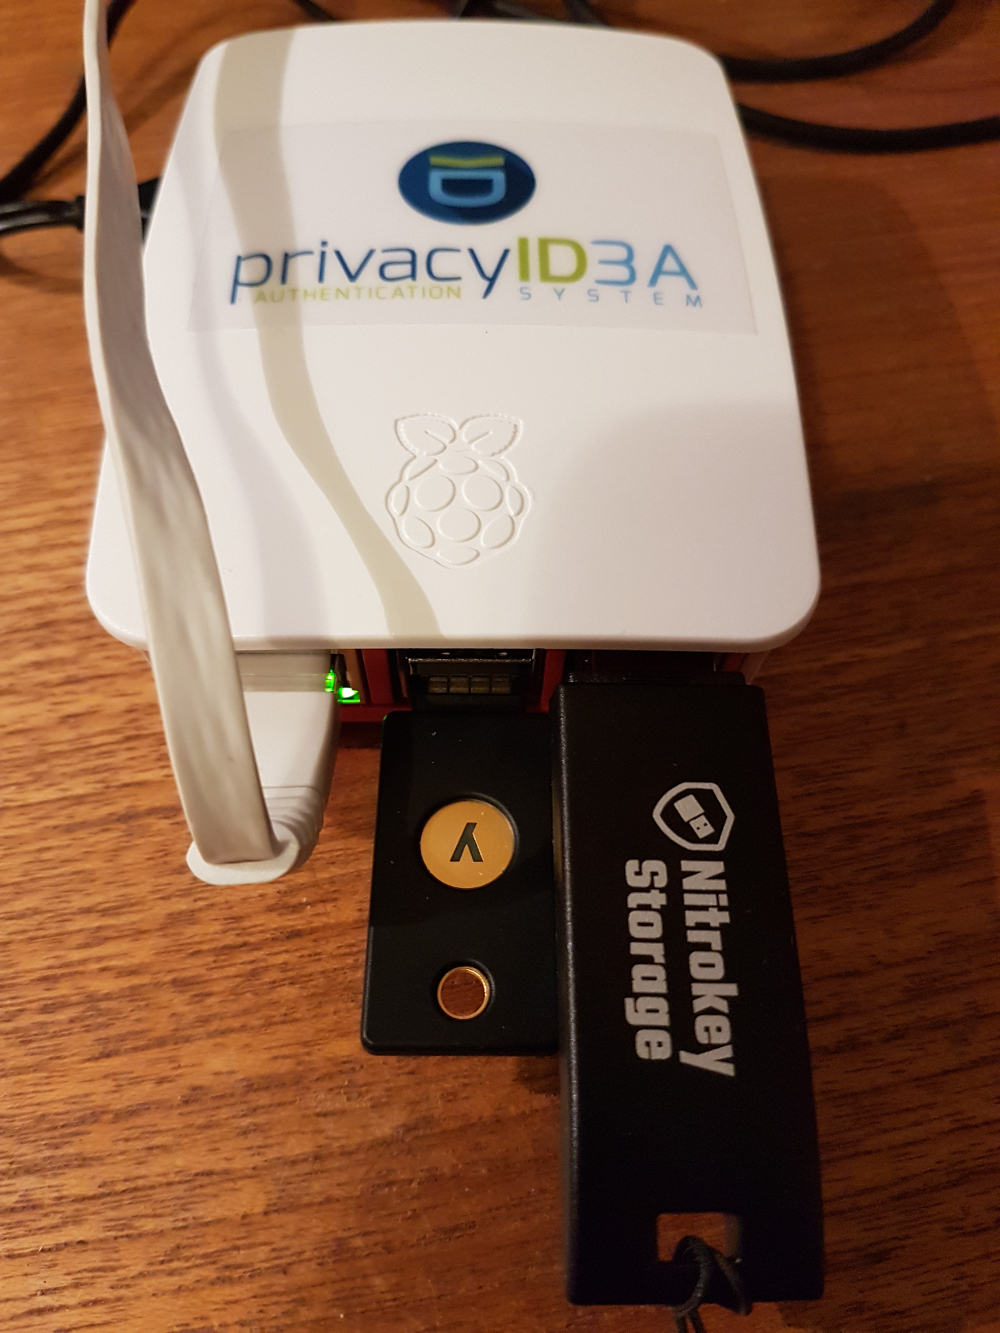
But to initializes these devices you need some drivers on your system. This is why it can be a good idea to set up a dedicated enrollment station. This integration guide takes you through the steps of setting up a Raspberry PI 3B as enrollment station. Thanks to the form factor this enrollment station looks like a simple smartcard reader on your desk. You connect it the LAN and power and you are done.
You connect with SSH (e.g. via putty or any other SSH client) to the enrollment station and issue a single command to initialize the tokens.
Putting Ubuntu 16.04 on the Raspberry PI
We are choosing Ubuntu 16.04 since it comes with the correct versions of all necessary drivers. Ubuntu Mate is available as 16.04 for the Raspberry PI 3.
You need to download the image and write it to the SD card. Please see the notes on the Ubuntu Mate page on how to do this on either Linux oder Windows.
After writing the SD card, insert the SD card in the Raspberry PI, connect power, monitor, keyboard and mouse and boot into the system.
Preparing for Yubikey
Install the follogin packages to be able to enroll the Yubikey.
apt-get install yubikey-personalization python-sqlite python-requests \
                python-usb python-cffi python-enum python-yubico libykpers-1-1
Preparing for Nitrokey
The Nitrokey driver is not contained in the Ubuntu repositories. But you need to install the following prerequisites:
apt-get install libhidapi-dev git
You need to use the Nitrokey library available at github:
git clone https://github.com/nitrokey/libnitrokey
git checkout v1.0
make CXX=g++
After the successfull build, simple copy the nitrokey library to a system directory.
cp build/libnitrokey.so /usr/lib
Install privacyIDEA admin client
You need the privacyIDEA admin client to enroll the Yubikey and Nitrokey.
add-apt-repository ppa:privacyidea/privacyidea
apt-get update
apt-get install privacyideaadm
Enrolling Tokens
To enroll Yubikeys you can now issue the command
privacyidea -U https://your.privacyidea.server --admin super token yubikey_mass_enroll
while “super” being the name of your administrator. If you do not have a trusted certificate during your tests, you might use the option “–nosslcheck”.
This command will enroll the connected Yubikey and ask you to insert the next Yubikey. It will initialize Yubikeys and create new token objects in privacyIDEA until you hit Ctrl-C to exit the program.
To enroll Nitrokeys you can run the command
privacyidea -U https://your.privacyidea.server --admin super token nitrokey_mass_enroll
Ease your life
You will login to the enrollment station via SSH when you mass enroll tokens. You may find it tedious to enter all the parameters. Thus you can use a configuration file for the admin client. Create a file “yubikey” with all the parameters as content:
-U
https://172.16.200.108
--admin
super
token
yubikey_mass_enroll
and now you can easily enroll tokens with the command
privacyidea @yubikey
The “@yubikey” will read the parameters from the file “yubikey”. In the same way you can create a file for enrolling Nitrokeys.